
Have you ever snapped that perfect moment, only to find your photo blurry and out of focus? It’s frustrating, especially when you can’t capture the moment again. But don’t worry, you’re not alone; many of us face this issue and look for a way to unblur image. Be it due to camera shake, poor lighting, or a moving subject, blurry photos can seem impossible to fix.
But the good news is that this article shows you exactly how to unblur images free and restore your photos to their sharp, clear glory in a snap.
So, let’s get started.
Part 1. Understanding Why Photos Get Blurry
Blurry photos can be frustrating, especially when they capture moments that you can’t recreate. But why do photos become blurry in the first place? Let’s break down some of the most common reasons:
- Camera Shake: Camera shake perhaps is one of the most common ones out there. If your camera moves slightly during the frame getting clicked, the final photo may appear out-of-focused. This is particularly more noticeable in lower lighting conditions where slower shutter speeds are required.
- Poor Focus: Sometimes, your camera autofocus might not lock onto the proper subject and leave an image soft or blurry. Most times, this occurs because either the subject is moving or because of a number of focusing points in the scene.
- Low Light: Cameras cannot produce sharp images in low light conditions, as it require longer exposure times, which may cause blurry shots, especially when there is some sort of movement while taking a photo.
- Moving Objects: In capturing fast-moving objects, either people or other vehicles, the camera often cannot follow the movement of the subject. This most often leads to a kind of motion blur, where the moving subject looks blurred or streaked.
Understanding these reasons helps us identify why our photos may lack the clarity we desire. Fortunately, with the right tools, most of these blurry moments can be corrected, so let’s see how to unblur image AI.
Part 2. Why Choose insMind’s Unblur Tool for Your Photos?
Not all tools are created equal when it comes to the restoration of blurry photos. That’s where insMind’s Unblur Tool stands tall among its peers. By harnessing advanced, AI-powered technologies, this tool can quickly and accurately restore your photos to crystal clear in almost no work from you at all.
AI technology plays a key part in its functionality. It analyzes an image and specifies the pattern of blur, making some intelligent adjustments to create a much sharper photo by filling out the details missing in focus. This yields results not possible with other current techniques relying on manual and frustrating changes.
Whether your photo is blurry due to motion, camera shake, or poor focus, insMind’s AI tool will work backstage to fix the blur without compromising the quality of the image. With just a few easy steps, you can transform your photo back into a clear and crisp image using unblur image online, saving you headache and frustration.
Part 3. How to Unblur Photos Using insMind Photo Editing Tool
The unblur tool by insMind makes restoring your blurry photos pretty easy and fast. Here’s a step-by-step guide to help you remove blurriness from photos:
Step 1: Access the Unblur Image Page
First, visit the insMind Unblur Image. This link will lead directly to this tool and get your pictures from being blurred into focus in no time.
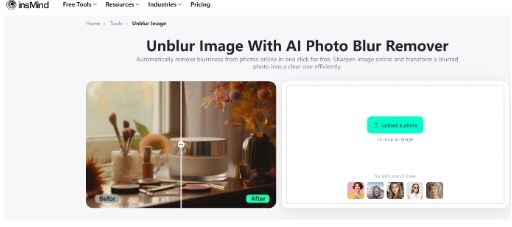
Step 2: Upload Your Photo
Once you reach the Unblur Image page, upload the blurry photo you want to fix. Just click the “Upload a Photo” button and select the photo from your device that you want to enhance. Be it any format of image or file type of your photo; this tool can upload them with ease.

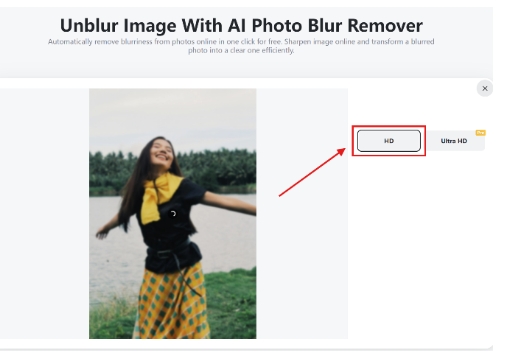
Step 3: Remove Blurriness from Photo
Once you have uploaded your picture, this AI-powered enhanced blur remover will automatically analyze your photo and detect the areas in the picture that are blurry. All you have to do is click HD or Ultra HD button to let the tool start sharpening and reducing the blur on the image.
Step 4: Download or Editing
Once enhanced, you will be able to directly download the fixed picture on your device or edit it further. You click “Download” if the result without blur is already to your satisfaction.
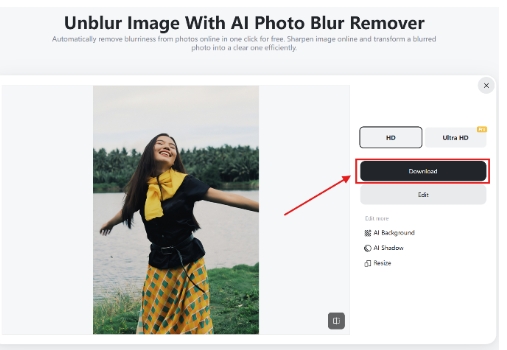
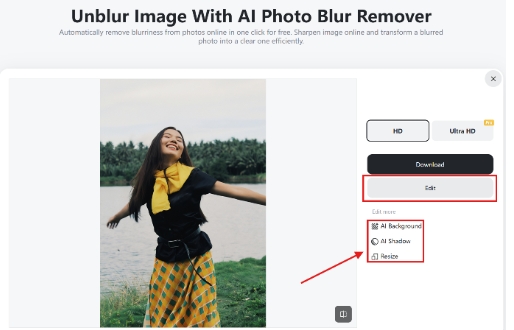
Otherwise, use other editing features that are available on the platform to fine-tune the picture regarding contrast, brightness, or whatever you want, and save the final version.
Follow these simple steps to restore blurred photos to sharp and clear views for your enjoyment.
Part 4. Tips for Best Results When Unblurring Photos
To get the best from insMind’s Unblur or AI sharpen image tool, here are some practical ways to ensure you achieve optimal results:
- Use High-Resolution Images
The results will also be better if the original image is not too blurred. When possible, use high-resolution photos for unblurring, as they contain more detail for the AI to enhance and restore clarity. Low-resolution images might improve, but the outcome may not be as sharp or detailed as you would like it to be.
- Fine-Tune the Unblur Settings
Once the initial unblurring is done, take a moment to adjust the settings for the best result. Most of the tools will allow you to adjust the level of unblurring, including insMind’s. Try fiddling with these settings to get that sweet spot between clarity and sharpness that looks natural. Sometimes too much adjustment may lead to artifacts or an unnatural look.
- Combine Unblurring with Other Editing Tools
But to get even better results, consider making this a combination of unblurring with other available photo editing means on the site. You can further enhance the photo after the AI is done restoring clarity by playing with contrast, sharpness, or brightness. These additional tweaks might just serve to make the details pop a whole lot better and actually give your photo a really far more vibrant and lifelike appearance.
- Focus on the Key Area of the Image
Focus the main concentration on that area of the photo that may have some specific blur-irritating area, for example, face, text, or generally an important object. In this way, when you start zooming in closer, it allows you to get even more precise adjustments in an area to ensure the main subject of your photo is looking as sharp as possible, although the other parts may still be slightly softer.
Conclusion
No more annoying blurry photos, the magic of insMind’s AI Unblur Tool will replace it with your image crisp as crystal in the twinkling of an eye. Be that camera shake, improper focusing, or just basically motion blur, this amazingly user-friendly tool will do this job with fantastic precision. All you have to do now is apply these simple and easy steps along with some applied tips that will help you get just what you want in only a few seconds.
Ready to convert fuzzy photos into razor-sharp, sharp, clear pictures? Try now with insMind’s unblur tool and see the real magic!


